In our some previous articles we discussed about some penetration testing labs, like PentestLab , DVWA where we can practice and improve our attacking skills. In today's article we are going to discuss about how to set SQLi lab on Kali Linux to test our SQL Injection skills. Advanced SQL Injection is still a major bug can be found on various sites. That because still learning and growing SQL Injection skills are profitable for cybersecurity experts and bug bounty hunters.
For this lab setup we are going to use SQLi_Edited, this is a upgraded fork of sqli-labs (Dhakkan Labs). Before cloning it from GitHub let we move to our /var/www/html directory, we are going to clone it there to make things easy.Here we need to clone the repository from GitHub by using following command:
In the following screenshot we can see that this repository is successfully cloned to the directory.
Now we can go inside this directory by using following command:
Here we use ls command to see all the files, as we can see in the following screenshot:
Here we can see the directory named "sqlilabs", Now we move it on the previous directory and rename it for easy to open by applying following command:
Then we back to our previous directory by using following command:
We can see the process in the following screenshot:
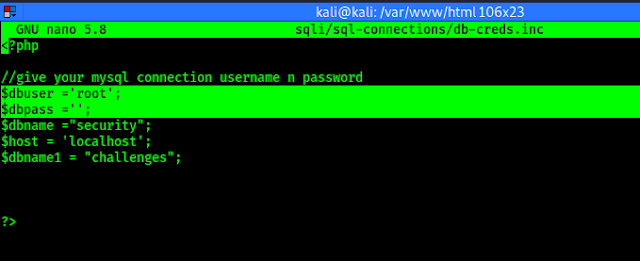
Now we need to edit database credential file named "db-creds.inc", which is located under "sqli/sql-connections/db-creds.inc" and put our user name and password for database. To edit it we are going to use infamous Linux text editor nano.
In the following screenshot we can see the default configuration of it, where the database user is root and database password is blank.
Now we modify this as per our Kali Linux system user, here we are using user "kali" and we can also choose a password as we want, as shown in the following screenshot:
Now we save and close it by typing CTRL+X, then Y, then Enter ↲.
Now we need to setup our mySQL database for our Kali Linux system. MySQL comes preloaded with Kali Linux. We need to open up our MariaDB as root user by using following command:
Then we need to create our user with password, in our case our user will be 'kali' and password will be '1234'. So the command for us will be following:
Now our user is created as we can see in the following screenshot:
Now we need to grant all permission to user 'kali' by using following command:
The screenshot of the above command is following:
Database setup is done, now we can exit from MariaDB by using CTRL+C keys and run following command to start our MySQL services:
Our setup is almost complete now we need to run our apache2 server (comes pre-loaded with Kali). We start our Apache2 web server by using following command:
Now our web server is running, we can see it by navigating to localhost/sqli URL from our browser. Our SQL Injection lab will open in front of us as we can see in the following screenshot:
Here for the very first time we need to 'Setup/reset database for labs'. After clicking there our database setup will start as we can see in the following screenshot:
Now a page will open up in our browser which is an indication that we can access different kinds of Sqli challenges, as we can see in the following screenshot:
Here we can solve various types of SQL injection challenges, by solving them our SQL Injection skill will be improved. For an example, to start the basic SQL Injection challenge we need to click on Lesson 1.
This is all for this article. We had learnt how we can set up SQL Injection labs on our Kali Linux system and practice our SQL Injection skills from basics to advance.
Love our articles? Make sure to follow us on Twitter and GitHub, we post article updates there. To join our KaliLinuxIn family, join our Telegram Group. We are trying to build a community for Linux and Cybersecurity. For anything we always happy to help everyone on the comment section. As we know our comment section is always open to everyone. We read each and every comment and we always reply.


