When we are talking about Linux and Terminal, we can't left Bash scripting. Bash scripting will be very helpful to become a cybersecurity expert, we can automate payloads and other tasks. On our this article we are gonna talk about 'Bash Scripting' and how to write accurate scripts on Linux.
The GNU Bourne-Again Shell (Bash) is a powerful tool and scripting engine. We can do automate many tasks on command-line. In our this guide we are learning Bash scripting and know some practical use case. Here we assume that we know about the Linux files, which discussed on previous article.
Introduction to Bash Scripting
A Bash script is a plain-text file that contains a series of commands that are executed as if they had been typed on terminal window. In general, Bash scripts have an optional extension of .sh for identification (but it can be run without extension name), begin wit #!/bin/bash and must have executable permission set before the script can be executed. Let's write a simple "Hello World" Bash script on a new file using any text editor, named it hello-world.sh and write the following contains inside it:
#!/bin/bash
# Hello World on Bash Script.
echo "Hello World!"
Then save and close it. In the above script we used some components which we need to explain:
- Line 1: #! is known as shebang, and it is ignored by the Bash interpreter. The second part, /bin/bash, is absolute path to the interpreter, which is used to run the script. For this we can identify that, this a "Bash script". There are various types of shell scripts like "zsh" and "C Shell script" etc.
- Line 2: # is used to add a comment. Hashed (#) tests will be ignored by interpreter. This comments will help us to take special notes for the scripts.
- Line 3: echo "Hello World!" uses the echo Linux command utility to print a given string to the terminal, which in this case is "Hello World!".
Now we need to make this script executable by running following command:
In the following screenshot we can see the output of the above command:
Now we can run the script by using following command:
We can see that our script shows output of "Hello World!" on our terminal as we can see in the following screenshot:
The chmod command, with +x flag is used to make the bash script executable and bash along with scriptname.sh we can run it. We can ./scriptname.sh to run the script. This was our first Bash script. Let's explore Bash in a bit more detail.
Variables
Variables are used for temporarily store data. We c an declare a variable to assign a value inside it, or read a variable, which will ""expand" or "resolve" it to its store value.
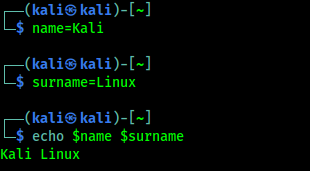
We can declare variable values in various ways. The easiest method is to set the value directly with a simple name=value declaration. We should remember that there are no spaces between or after the "=" sign.
On our terminal we can run following command:
Then we again run another command:
Variable declaring is pointless unless we can use/reference it. To do this, we precede the variable with $ character. Whenever Bash see this ($) syntax in a command, it replaces the variable name with it's value before executing the command. For an example we can echo both this variable by using following command:
In the following screenshot we can the output shows the values of the variables:
Variables names might be uppercase, lowercase or a mixture of both. Bash is case sensitive, so we must be consistent when declaring and expending variables. The good practice to use descriptive variable names, which make our script much easier for others to understand and maintain.
Bash interprets certain characters in specific ways. For example, the following declaration demonstrates an improper multi-value variable declaration:
In the following screenshot, we can see the output.
This was not necessarily what we expected. To fix this type of error we can use single quote (') or double quote (") to enclose our text. Here we need to know that Bash treats single quotes and double quotes differently. When Bash meets the single quotes, Bash interprets every enclosed character literally. When enclosed in double quotes, all characters are viewed literally expect "$" and "\" meaning variables will be expended in an initial substitution pass on the enclosed text.
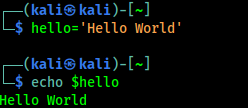
In the case of above scenario we the following will help to clarify:
Now we can print this variable using echo, shown in following screenshot:
In the above example, we had used the single quote (') to use the variable. But when we use the hello variable with something other then we need to use double quote ("), we can see following for better understanding:
Now we can see the print (echo) of new $hello2 variable on the following screenshot:
We can also set the value of the variable to the result of a command or script. This is also known as command substitution, which allows us to take the output of a command (what would normally be printed to the screen) and have it saved as the value of a variable.
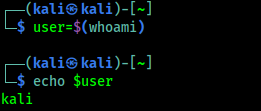
To do this, place the variable name in parentheses "()", preceded by a "$" character:
Here we assigned the output of the whoami command the user variable. We then displayed it's value by echo. In the following screenshot we can see the output of the above command:
An alternative syntax for command substitution using backtick (`), as we can see in the following commands:
This backtick method is older and typically discouraged as there are differences in how the two methods of command substitution behave. It is also important to note that command substitution happens in a subshell and changes to variables in the subshell will not alter variables from the master process.
Arguments
Not all Bash scripts require arguments. However, it is extremely important to understand how they are interpreted by bash and how to use them. We have already executed Linux commands with arguments. For example, when we run command ls -l /var/log, both -l and /var/log are arguments to the ls command.
Bash scripts are not different, we can supply command-line arguments and use them in our scripts. For an example we can see following screenshot:
In the above screenshot, we have created a simple Bash script, set executable permissions on it, and then ran it with two arguments. The $1 and $2 variables represents the first and second arguments passed to the script. Let's explore a few special Bash variables:
| Variable Name | Description |
|---|---|
| $0 | The name of the Bash script |
| $1 - $9 | The first 9 arguments to the Bash script |
| $# | Number of arguments passed to the Bash script |
| $@ | All arguments passed to the Bash script |
| $? | The exit status of the most recently run process |
| $$ | The process id of the current script |
| $USER | The username of the user running the script |
| $HOSTNME | The hostname of the machine |
| $RANDOM | A random number |
| $LINENO | The current line number in the script |
Some of these special variable can be useful when debugging a script. For example, we might be able to obtain the exit status of a command to determine whether it was successfully executed or not.
Reading User Input
Command-line arguments are a form of user input, but we can also capture interactive user input during a script is running with the read command. We are going to use read to capture user input and assign it to a variable, as we did in the following screenshot:
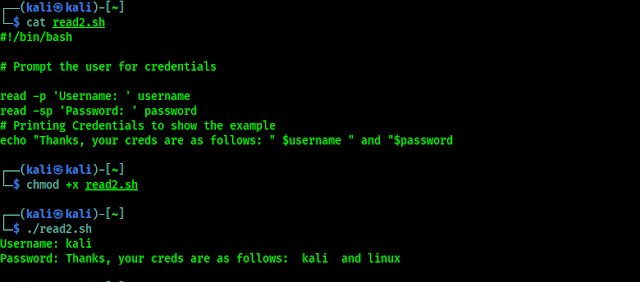
We can alter the behavior of the read command with various command line options. Two of the most commonly flags include -p, which allows us to specify a prompt, and -s, which makes the user input silent/invisible (might be helpful for credentials). We can see an example in the following screenshot:
If, Else, Elif
If, Else, Elif are considered as most common conditional statements, which allow us to show different actions based on different conditions.
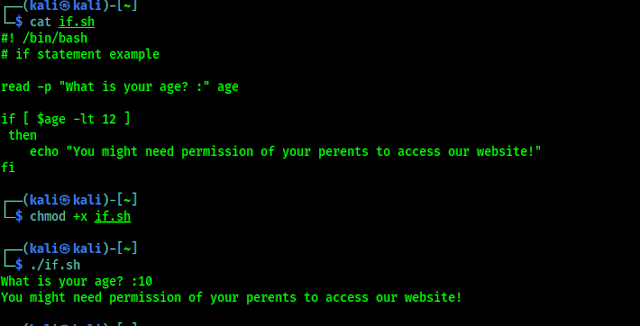
The if statement is quite simple. This checks to see if a condition is true, but it requires a very specific syntax. We need to be careful to attention to this syntax, especially the use of required spaces.
In the above screenshot if "some statement" is true the script will "do some action", these action can be any command between then and fi. Lets look at an actual example.On the above example, we used an if statement to check the age inputted by a user. If the user's age was less than (-lt) 12, the script would output a warning message.
Here the square brackets ([ &]) in the if statement above are originally reference to the test command. This simply means we can use all of the operators that are allowed by the test command. Some of the widely used operators include:
- -n VAR - True if the length of VAR is greater than zero.
- -z VAR - True if the VAR is empty.
- STRING1 = STRING2 - True if STRING1 and STRING2 are equal.
- STRING1 != STRING2 - True if STRING1 and STRING2 are not equal.
- INTEGER1 -eq INTEGER2 - True if INTEGER1 and INTEGER2 are equal.
- INTEGER1 -gt INTEGER2 - True if INTEGER1 is greater than INTEGER2.
- INTEGER1 -lt INTEGER2 - True if INTEGER1 is less than INTEGER2.
- INTEGER1 -ge INTEGER2 - True if INTEGER1 is equal or greater than INTEGER2.
- INTEGER1 -le INTEGER2 - True if INTEGER1 is equal or less than INTEGER2.
- -h FILE - True if the FILE exists and is a symbolic link.
- -r FILE - True if the FILE exists and is readable.
- -w FILE - True if the FILE exists and is writable.
- -x FILE - True if the FILE exists and is executable.
- -d FILE - True if the FILE exists and is a directory.
- -e FILE - True if the FILE exists and is a file, regardless of type (node, directory, socket, etc.).
- -f FILE - True if the FILE exists and is a regular file (not a directory or device).
We had applied these things to the above if statement example and we remove the square brackets using test string. But we think that the square bracket makes the code more readable.
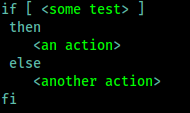
We also can perform a particular set of actions if a statement is true and other statement is false. To do this, we can use the else statement, which has the following syntax:
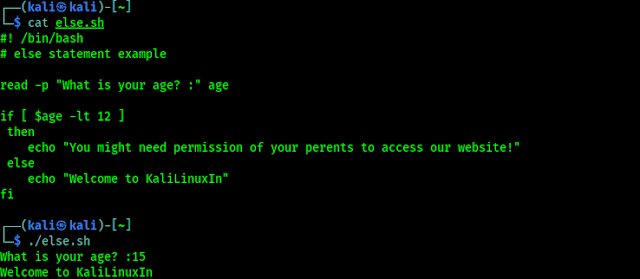
Now for an example we expand our previous age example including our else statement, as shown in the following screenshot:We can easily notice that the else statement was executed when the inputted age was not less than 12.
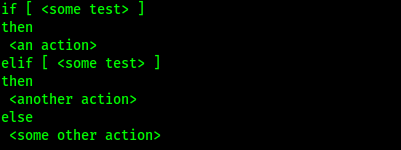
We can add more arguments to the statements with the help of elif statement. The example will be following:
Let's extend our age example with elif statement in the following screenshot:On the above example we can see that the code is little bit complex compared to if and else. Here when the user inputs the age grater than 60 elif statement will be executed and output the "Salute ..." message.
These are the basic uses of bash. Here we learn some simple bash scripts. There are lots of more topic to cover but we don't want to make the article longer. If you want next part please Tweet us.
In today's article we learned Basics of Bash scripting on our Kali Linux. Not only Kali Linux this tutorial will work on any Debian based Linux distro like Ubuntu, Linux Mint etc.
Love our articles? Make sure to follow us on Twitter and GitHub, we post article updates there. To join our KaliLinuxIn family, join our Telegram Group. We are trying to build a community for Linux and Cybersecurity. For anything we always happy to help everyone on the comment section. As we know our comment section is always open to everyone. We read each and every comment and we always reply.


